LiDAR and ToF Cameras – Technologies explained

Autonomous cars and mobile machines are in need of ranging sensors. In the last decades a bunch of technologies where introduced and many technological terms are used in this context: Lidar, Time-of-Flight (ToF) cameras, Stereo, Radar, Laser scanners and many more. Some of us might be confused about the sheer amount of different wordings.

The graph below gives an overview of various ranging technologies and how they are related to each other. This article focuses on a comparison of Lidars and ToF cameras.
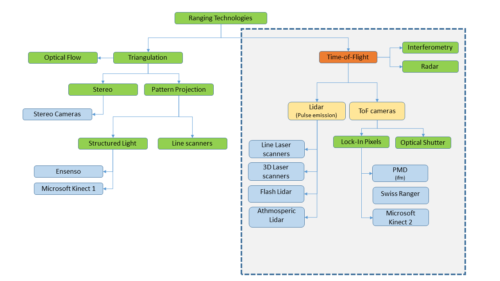
Various ranging technologies available on the market. Rarely used technologies as depth from defocusing are not included.

The principles

Principally sensors measuring the time of flight emit some kind of signal and measure the delay at the receiver. The delay is proportional to the distance of an object.

Lidars, Radars and Interferometry are a well establish technologies. Radar uses electromagnetic waves, interferometry uses coherent light, which is hard to apply on out-of-laboratory use-cases.

In previous years Lidars where only available as scanners, however this changed with the introduction of Flash Lidars. With having Lidar cameras on the market, there might be confusion about what the technological differences are.

Time-of-Flight

In general, Time-of-Flight describes a measurement principle without specific technology in mind, that is measuring the travel time of a signal and derive the travel distance. Radars, Lidars, Light modulation sensors and other technologies use this principle.

Due to historical reasons however, the term Time-of-Flight is usually applied to Lidars and cameras using as technological term.

Lidar – Emission of Light Pulses

Lidar stands for Light-Detection-and-Ranging. The term is used for sensors that emit pulses and measure the time delay between emission and reception of these pulses (see below figure). The principle is comparable to Radar, however using light instead of electromagnetic waves (which is actually only another frequency domain, but let’s not be silly here).
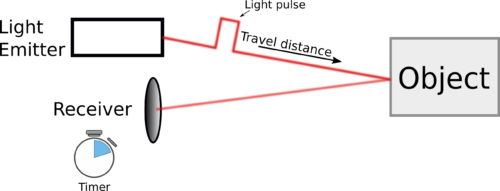
Working principle of Lidars: Pulse emission. The receiver contains an electronic curcuit that detects the reflected pulse and calculates its runtime.

This working principle is used in various devices, e.g.:

  • 2D Laser scanners (e.g. Sick, Leutze, …)
  • 3D Laser Scanners (Velodyne, …)
  • 3D architecture Laser scanners (e.g. Leica Geosystems, …)
  • Flash Lidars (Continental, …)

The particular implementation may vary, but the measuring principle remains the same:

Send out a pulse, detect it at receiver side and derive the distance from the time delay between emission and reception.

While conventional Lidar technology continuously scans the environment (like a machine gun), newer approaches are able to flash the entire scene with one beam and measure the time delay for a whole pixel matrix at once (Flash Lidar).

Flash Lidar might be a big leap for automotive applications, because scanning requires complicated mechanical or electronical (in case of phased arrays) technology and usually reduces the frame rate. However illuminating the whole scene introduces new systematical problems. ToF cameras have to suffer of some of these.

How are ToF cameras different from Lidars?

ToF cameras – Detecting phase shift

A newer technology does not use single pulses, but continuously illuminates the whole scene with a modulated light (laser or LED). The receiver integrates this signal for a certain amount of time and derives the distance from the signal’s phase shift on receiver side. The time-of-flight and thus the distance is proportional to the signal’s phase shift.
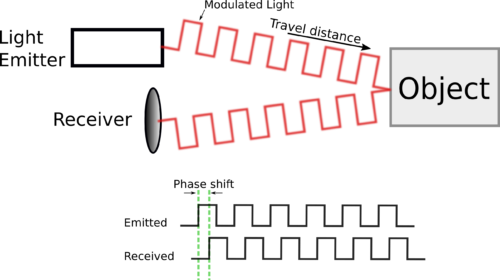
Companies and institutes call these cameras also Time-of-Flight (ToF) cameras. As we already have seen, Time-of-Flight may refer to various technologies, thus this term may lead to some confusion.

The working principle in short:

Modulate a light source and measure the phase shift of the modulation between emitter and receiver.

One main advantage of ToF cameras compared to Lidars is the much simpler pixeldesign – often realized with standard CMOS processes. Also the system integration and scalability is far simpler to achieve. Thus ToF cameras are in principle much cheaper to produce and can be easily scaled.

Following a list of some ToF camera manufacturers:

  • Industrial cameras from ifm (O3D, O3X, O3M)
  • Consumer cameras from PMDTec (one of the initiators of this technology)
  • Mesa Imaging (one of the initiators of this technology)
  • Panasonic
  • Microsoft Kinect 2

Comparing Lidars and ToF Cameras

As explained above, the main difference between Lidars and ToF cameras is:

  • Lidars use light pulses to measure the time-of-flight
  • ToF cameras use a continuous wave to derive the time-of-flight from its phase shift.

Pros

LidarToF Camera
Better in dusty/foggy environments (does not apply to Flash Lidar)Much smaller form factor, easier integration and miniaturization
Better accuracyLower price
Less systematical errors No rolling shutter effect, range data for all pixel synchronious (applies also for Flash Lidar).
Usually higher lateral resolution
Higher framerate
Mechanical robustness (applies also to Flash Lidar or phased array Lidars)

Cons

LidarToF Camera
More expensiveLower accuracy
Usually a scan line only. Stacking of multiple devices to get 3DBad performance with fog and dust
Usually rolling shutter effectSystematic errors due to stray light and multi path (applies also to Flash Lidar)
Bulkier formfactorLower measurement range
Lower lateral resolutionMotion artifacts at objects with high lateral speed.


O3D and Frequency modes

The ifm O3D series of cameras and sensors provide parameters to change the frequency mode. What is a frequency mode and which settings to choose?

What means frequency?

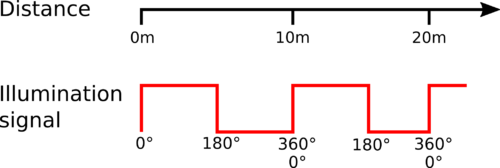
The word frequency refers to the modulation frequency of the illumination. The measurement principle of O3D, O3M and O3X cameras uses a continuous modulation of the illumination. Principally it’s a square waveform.

The O3D provides three different “modulation frequencies” or “modulation channels” (both terms have same meaning): 28, 29 and 30 MHz. When using the single frequency mode, one of these frequencies or channels can be chosen. When using multiple devices close by, it is advisable to set each of the devices to different modulation frequencies. This way interferences can be minimized.

The principle is analogous to receiving different radio channels at different frequencies – in case of ToF cameras in the form of light.

What are frequency modes?

The standard frequency mode is “single frequency”. In this mode, the O3D uses only one modulation frequency for measurement. However, that way, the possible measurement range is only up to 5m. Every object at a distance of 6m is measured at a distance of 1m again. Why is that?

As mentioned, the measurement principle uses a continuous wave. A wave is periodical, with repeating values after each 360°. Therefor the measurement value is repeating. See below sketch.

For measurement of object distances, the distances shown in above figure need to be divided by 2, because of the way forth and back.

If you are interested in a more detailed explanation, see subheading The Ambiguity Problem for more details.

To be able to measure beyond 5m (10m light path), the O3D supports multiple-frequency modes. Internally the camera takes multiple images with two or even three different modulation frequencies and combines the data to one frame without ambiguities.

Here is a list of measurement ranges with no ambiguity:

 Unambiguity rangeParameter string
single frequencyUp to 5munder5m_[exposure_mode]
double frequencyUp to 30mupto30m_[exposure_mode]
triple frequencyBeyond 30mmorethan30m_[exposure_mode]
The frequency mode can be set via custom software. Therefor a parameter string is specified in the form of [frequency-mode]_[exposure_mode]. See the right column of the table. The exposure modes are discussed in another post.


Whenever the O3D uses multiple frequencies for each frame, be aware of potential interferences with other devices.

The Ambiguity Problem

Example: Let’s assume a modulation frequency of 30MHz. Given the speed of light with c_0=299 792 458 m/s, we get a wave length \lambda_{mod}=\frac{c_0}{f_mod} = \frac{299 792 458 m/s}{30 000 000 Hz} \approx 10m

That means, that our light wave has a wave length of 10m. Beyond 10m it repeats. When measuring, the light wave needs to travel forth and back, thus the distance to objects without ambiguity is 5m.

See also the below figure.

Pixel Size Calculator


How To: Switch the O3D to 100k mode

The O3D camera series of ifm electronic provides 23k of lateral resolution, 176×132 pixels. However, the actual imager has a 100k resolution, 352×264 pixels. Is it possible to use the native resolution? – Yes, it is. This article shows how to do it and what to be aware of.

23k vs. 100k
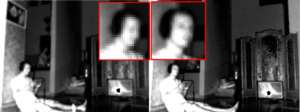
Amplitude image at 23k (left) and 100k (right).

Why only 23k per default?

The 23k is the result of 2×2 binning of the original pixel matrix. Binning means that 2×2 pixels are averaged together to provide a single data value.

There are certainly many reasons, why ifm decided to reduce lateral resolution. Probably the main reason was to increase data quality. The more pixel are combined together, the less noise we get.

Here is a (not complete) list of potential benefits of a lower resolution:

  • reduced noise
  • more electrons collected per binned pixel, thus more sensitive to low signal
  • more robust against saturation
  • less data load on the interface/less pixels to compute

What are the side effects of 100k?

The side effects of increasing the lateral resolution may include the following issues:

  • increased noise
  • low signal pixels more likely to be invalid
  • more prone to saturation
  • increased effects of motion blur
  • out-of-focus is more likely to be perceived visually (the lens is sharp at 1m). This is because the effective “pixel” size is half the size in each lateral dimension compared to the binned version.
  • More data load on the interface

Switching to 100k

The resolution can be set via a hidden (but officially supported) parameter. 100k mode can be set for each application on the O3D respectively. Make sure there is already a valid application running on your device.

Using the official ifm3d tool

The ifm3d suite consists of C++ libraries and tools to run the O3D and O3X sensors. Download the source code here: https://github.com/ifm/ifm3d

Once followed the build and install instructions, you can use the ifm3d command to configure the sensor. The idea proposed here is the following:

  1. download the sensor configuration as JSON string and save it to a text file
  2. manipulate the configuration
  3. Upload the configuration back to the sensor
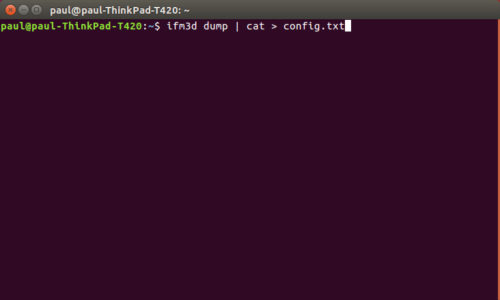
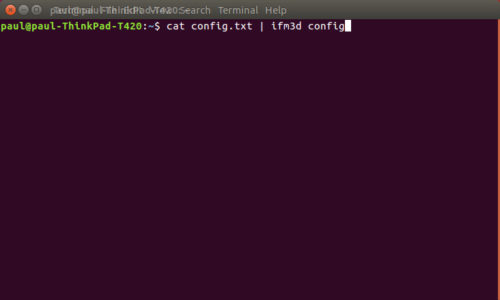
Step 1: To download the configuration from the device call ifm3d dump | cat > config.txt
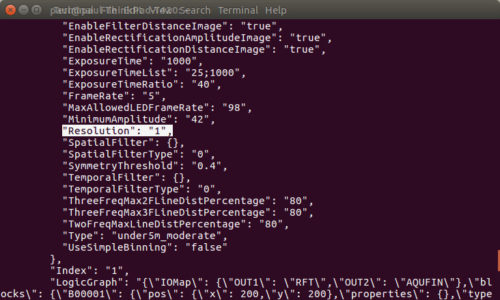
Step 2: Open the config.txt using a text editor of your choice. The resolution can be set for each application. Thus look for the right “Apps” node and the underlying “Resolution” parameter. Set it to 1 (0: 23k, 1: 100k) and save the file.
Step 3: Use the ifm3d command to upload the updated configuration.

Using Web-Interface

The web-interface on the O3D can be accessed with the following URL:

http://192.168.0.69/api/rpc/v1/com.ifm.efector/

Paste that URL into your favorite internet browser and replace the IP address if needed.

The underlying communication is based on xml-rpc, a protocol that can be implemented in custom programs. A documentation of the O3D’s xml-rpc interface can be found on the vendor site, http://www.ifm.com. Search for O3D.

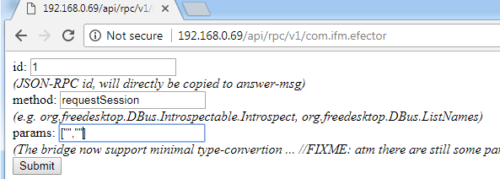
Step 1: Request session

To start communication with the camera, we need to get a session ID from the camera. Therefor we use the “requestSession” method and two parameters:

  • 1) Password. Per default disabled
  • 2) already existing session-ID to connect to

For sake of simplicity we assume no password protection. Thus both parameters are empty. However in the params mask we need to write all parameters as strings in quotation marks, thus we input two empty strings and click “Submit”.

Step 2: Increase the heartbeat interval

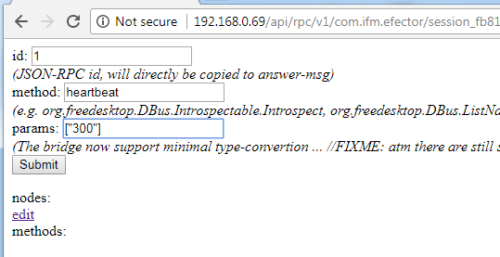
Whenever a session is opened, the server expects a I-am-still-there-don’t-close-the-connection signal, also called heartbeat. The heartbeat can be invoked on the session domain. Click on the newly opened session or add the session string to the URL in the browser address field.

Since the heartbeat interval is only a couple seconds, we need to set it to the maximum value. For manual use it’s too short otherwise. The maximum value is 300 seconds.

Step 3: Set to edit mode and edit application

In the same domain call setOperatingMode to 1. This enables editing.

Afterwards we need to choose the application to edit. Use the application number in the Vision-Assistant as a reference. Indexing starts with 1. In this example we choose application no. 1.

Step 4: Set the resolution

The resolution parameter can be found after going to the edit/application/imager_001 node, either by clicking on the hyperlinks or adding the sub/address to the URL. When calling the method “GetAllParameters”, the Resolution parameter appears:

In order to change the setting invoke the method “SetParameter” with the parameters [“Resolution”,”1″].

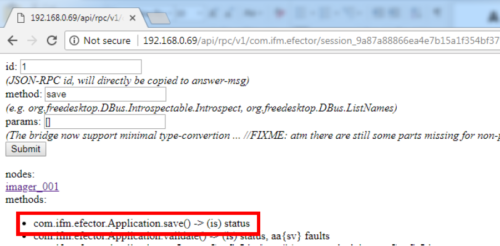
Step 5: Save and exit

The save method can be invoked in the application domain. Therefor shorten the URL by the imager_001 node and invoke the save method.

After saving the settings are applied. It is good practice to close session under the session parent node (“cancelSession” method).

Python Script

The below python script works with python 3 and is based on the very useful o3d package o3d3xx-python which is hosted on github.
You can invoke the script from your command shell:

>>python this_script.py -h
from builtins import *
import o3d3xx
import sys
import getopt
def usage():
helptext = "switch_resolution.py [-i ] -a <app-index, 0: create new> -r <0: 20k, 1: 100k>";
print(helptext)
 
def main(argv):
    ipaddress = "192.168.0.69";
    app_index = 0
    res_index = 0
 
    try:
        opts, args = getopt.getopt(argv,"hi:a:r:")
    except getopt.GetoptError as err:
        print(err)
        usage()
        sys.exit(2)
 
    have_res = False
    have_app = False
    for opt, arg in opts:
        if opt == '-h':
        usage()
        sys.exit()
        elif opt in ("-i"):
        ipaddress = arg
        elif opt in ("-r"):
        res_index = int(arg)
        have_res = True
        elif opt in ("-a"):
        app_index = int(arg)
        have_app = True
 
    if not have_app or not have_res:
        usage()
        sys.exit(2)
 
    # create device
    device = o3d3xx.Device(ipaddress)
 
    # open a session and create an application for editing
    session = device.requestSession()
    session.startEdit()
    if app_index == 0: # we create a new application
        app_index = session.edit.createApplication()
        application = session.edit.editApplication(app_index)
        application.setParameter("Name", "PythonScript " + str(app_index))
        else:
        application = session.edit.editApplication(app_index)
 
    application.imagerConfig.setParameter("Resolution", str(res_index))
    session.edit.device.setParameter("ActiveApplication", str(app_index))
    application.save()
    session.cancelSession()
 
    if __name__ == "__main__":
    main(sys.argv[1:])