
The O3D camera series of ifm electronic provides 23k of lateral resolution, 176×132 pixels. However, the actual imager has a 100k resolution, 352×264 pixels. Is it possible to use the native resolution? – Yes, it is. This article shows how to do it and what to be aware of.
Why only 23k per default?
The 23k is the result of 2×2 binning of the original pixel matrix. Binning means that 2×2 pixels are averaged together to provide a single data value.
There are certainly many reasons, why ifm decided to reduce lateral resolution. Probably the main reason was to increase data quality. The more pixel are combined together, the less noise we get.
Here is a (not complete) list of potential benefits of a lower resolution:
- reduced noise
- more electrons collected per binned pixel, thus more sensitive to low signal
- more robust against saturation
- less data load on the interface/less pixels to compute
What are the side effects of 100k?
The side effects of increasing the lateral resolution may include the following issues:
- increased noise
- low signal pixels more likely to be invalid
- more prone to saturation
- increased effects of motion blur
- out-of-focus is more likely to be perceived visually (the lens is sharp at 1m). This is because the effective “pixel” size is half the size in each lateral dimension compared to the binned version.
- More data load on the interface
Switching to 100k
The resolution can be set via a hidden (but officially supported) parameter. 100k mode can be set for each application on the O3D respectively. Make sure there is already a valid application running on your device.
Using the official ifm3d tool
The ifm3d suite consists of C++ libraries and tools to run the O3D and O3X sensors. Download the source code here: https://github.com/ifm/ifm3d
Once followed the build and install instructions, you can use the ifm3d command to configure the sensor. The idea proposed here is the following:
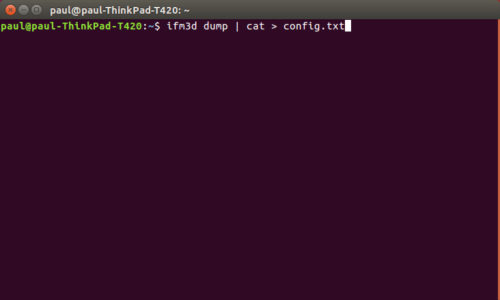
- download the sensor configuration as JSON string and save it to a text file
- manipulate the configuration
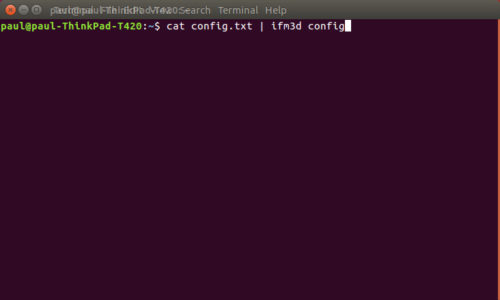
- Upload the configuration back to the sensor
Using Web-Interface
The web-interface on the O3D can be accessed with the following URL:
http://192.168.0.69/api/rpc/v1/com.ifm.efector/
Paste that URL into your favorite internet browser and replace the IP address if needed.

The underlying communication is based on xml-rpc, a protocol that can be implemented in custom programs. A documentation of the O3D’s xml-rpc interface can be found on the vendor site, http://www.ifm.com. Search for O3D.
Step 1: Request session
To start communication with the camera, we need to get a session ID from the camera. Therefor we use the “requestSession” method and two parameters:
- 1) Password. Per default disabled
- 2) already existing session-ID to connect to
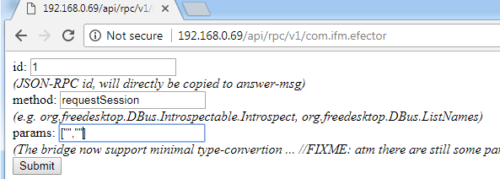
For sake of simplicity we assume no password protection. Thus both parameters are empty. However in the params mask we need to write all parameters as strings in quotation marks, thus we input two empty strings and click “Submit”.

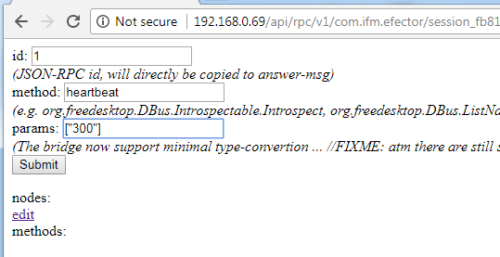
Step 2: Increase the heartbeat interval
Whenever a session is opened, the server expects a I-am-still-there-don’t-close-the-connection signal, also called heartbeat. The heartbeat can be invoked on the session domain. Click on the newly opened session or add the session string to the URL in the browser address field.
Since the heartbeat interval is only a couple seconds, we need to set it to the maximum value. For manual use it’s too short otherwise. The maximum value is 300 seconds.
Step 3: Set to edit mode and edit application
In the same domain call setOperatingMode to 1. This enables editing.

Afterwards we need to choose the application to edit. Use the application number in the Vision-Assistant as a reference. Indexing starts with 1. In this example we choose application no. 1.
Step 4: Set the resolution
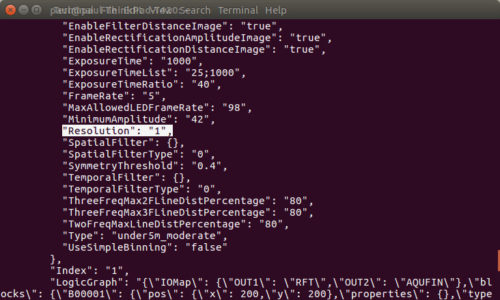
The resolution parameter can be found after going to the edit/application/imager_001 node, either by clicking on the hyperlinks or adding the sub/address to the URL. When calling the method “GetAllParameters”, the Resolution parameter appears:

In order to change the setting invoke the method “SetParameter” with the parameters [“Resolution”,”1″].
Step 5: Save and exit
The save method can be invoked in the application domain. Therefor shorten the URL by the imager_001 node and invoke the save method.

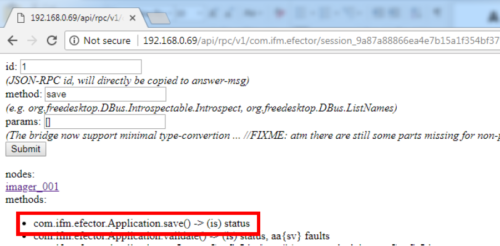
After saving the settings are applied. It is good practice to close session under the session parent node (“cancelSession” method).
Python Script
The below python script works with python 3 and is based on the very useful o3d package o3d3xx-python which is hosted on github.
You can invoke the script from your command shell:
>>python this_script.py -h
from builtins import *
import o3d3xx
import sys
import getopt
def usage():
helptext = "switch_resolution.py [-i ] -a <app-index, 0: create new> -r <0: 20k, 1: 100k>";
print(helptext)

def main(argv):
    ipaddress = "192.168.0.69";
    app_index = 0
    res_index = 0

    try:
        opts, args = getopt.getopt(argv,"hi:a:r:")
    except getopt.GetoptError as err:
        print(err)
        usage()
        sys.exit(2)

    have_res = False
    have_app = False
    for opt, arg in opts:
        if opt == '-h':
        usage()
        sys.exit()
        elif opt in ("-i"):
        ipaddress = arg
        elif opt in ("-r"):
        res_index = int(arg)
        have_res = True
        elif opt in ("-a"):
        app_index = int(arg)
        have_app = True

    if not have_app or not have_res:
        usage()
        sys.exit(2)

    # create device
    device = o3d3xx.Device(ipaddress)

    # open a session and create an application for editing
    session = device.requestSession()
    session.startEdit()
    if app_index == 0: # we create a new application
        app_index = session.edit.createApplication()
        application = session.edit.editApplication(app_index)
        application.setParameter("Name", "PythonScript " + str(app_index))
        else:
        application = session.edit.editApplication(app_index)

    application.imagerConfig.setParameter("Resolution", str(res_index))
    session.edit.device.setParameter("ActiveApplication", str(app_index))
    application.save()
    session.cancelSession()

    if __name__ == "__main__":
    main(sys.argv[1:])